How to Deploy Static Site to AWS S3 Bucket from GitHub

Let's Take a look at how to deploy a Blazor Static Site to an AWS S3 Bucket.
Published on September 27, 2020 by Coding Flamingo
AWS AWS S3 CI/CD Deploy
5 min READ
In this post we will create an AWS S3 bucket (using the portal) and then we are going to deploy our static site to it using GitHub Actions.
you can find all the code in: https://github.com/coding-flamingo/BlazorStaticDeploy
Video Version
Text Version
Prerequisites
- Have a Static Site in a GitHub repo.
- Have an AWS account with permissions to create S3 Buckets
- An IAM Role with API credentials for GitHub to push to your bucket.
Tutorial
Creating the S3 Bucket
- Go to the S3 Bucket console and create click on create new bucket.
- Enter the name of your bucket (this will be part of the url of the bucket).
- Select the region where you want your bucket.
- Click on Next.
- Leave all the Configuration Options as the default and click Next.
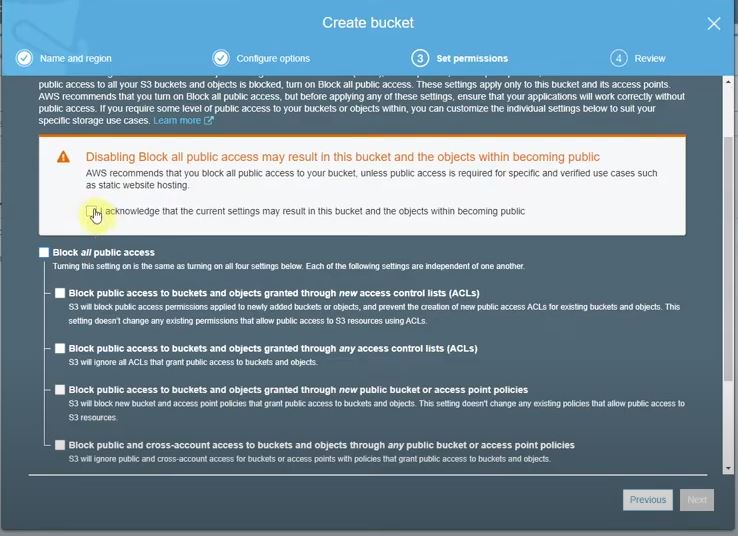
- Un-check the block all public address checkbox. (This will give you a warning that everyone will be able to see your bucket’s content. This is fine since we are hosting a webiste)
- Click the I acknowledge button:
- Click Next.
- Review that it all looks good, and click ‘Create bucket’.
Enabling Static Site on S3 Bucket
- Click on the S3 Bucket and Click on Properties.
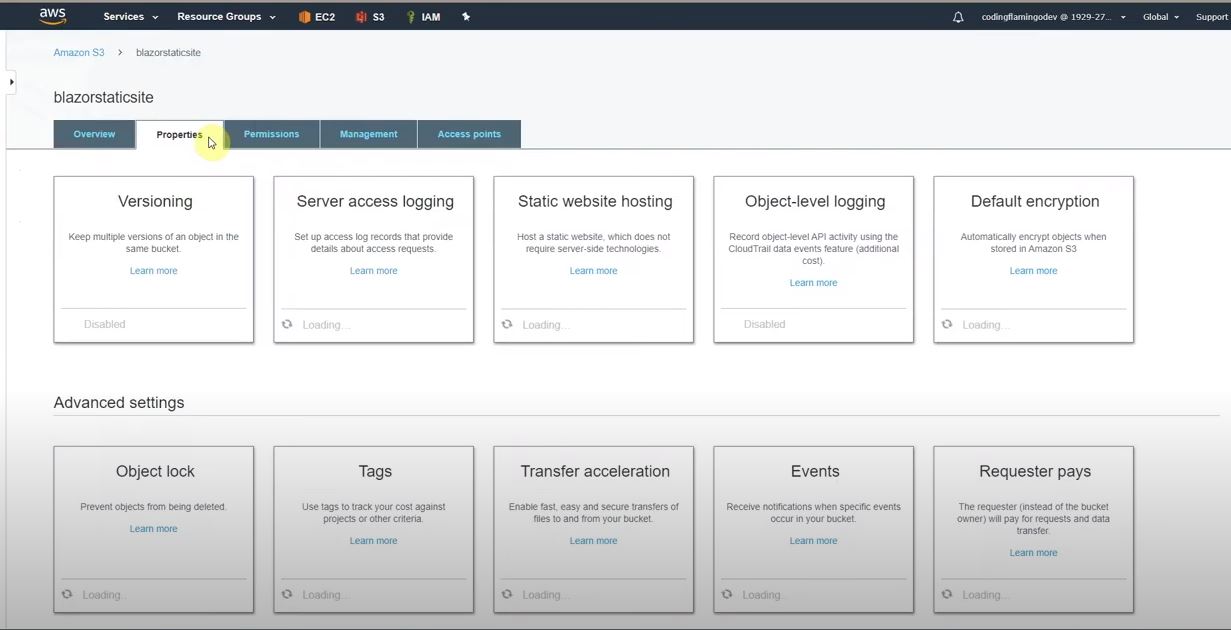
- Click on static website hosting.
- Select “Use this bucket to host a website”.
- Enter index.html in the index document (assuming that is the name of your index page)
- Enter index.html in the Error document (this is because AWS can’t easily route to sub pages so if you go to a sub page it will try to give a 404 and if you put your index page on it it will try to redirect to the correct page and if not it will show your 404 page).
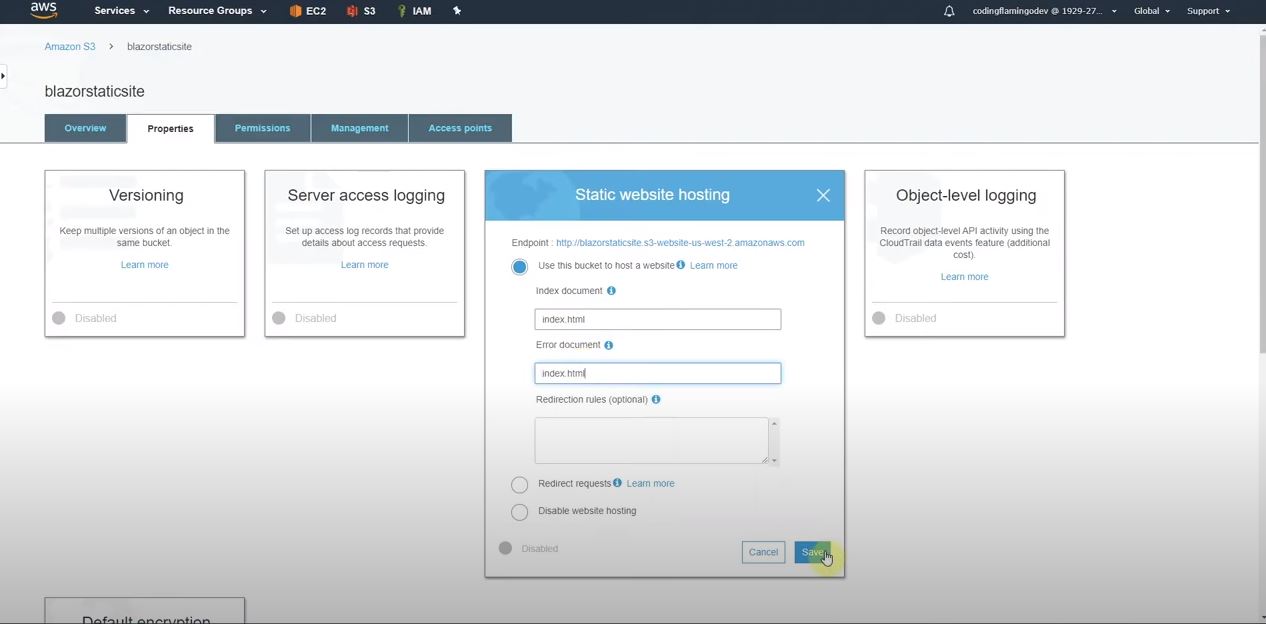
- Click Save.
Adding Permissions in the S3 Bucket for GitHub Account
- Click on Permissions and copy the bucket ARN:
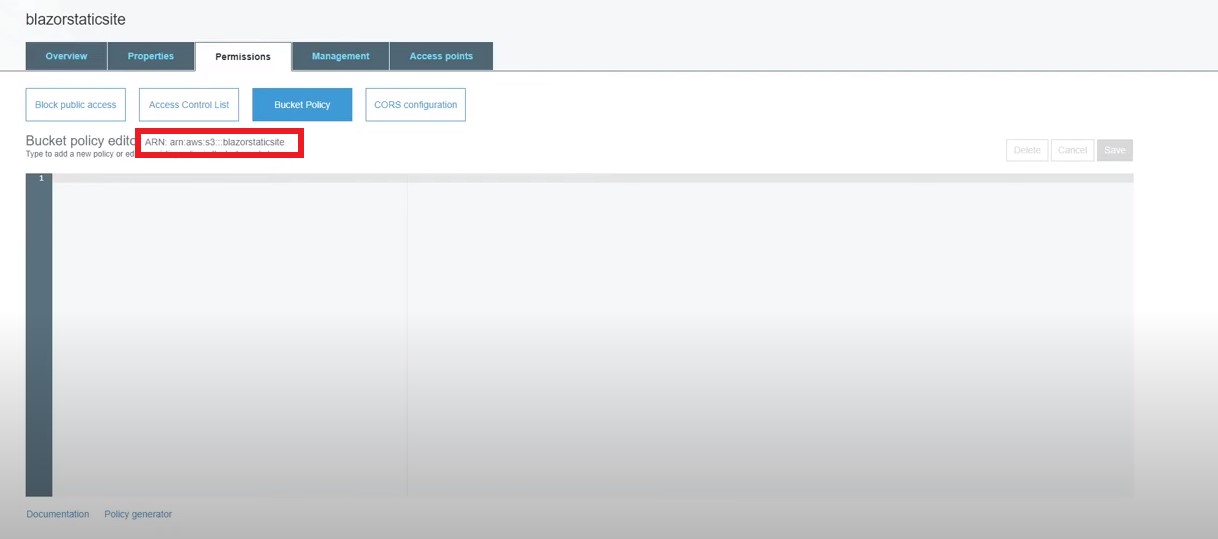
- Click on Policy Generator:
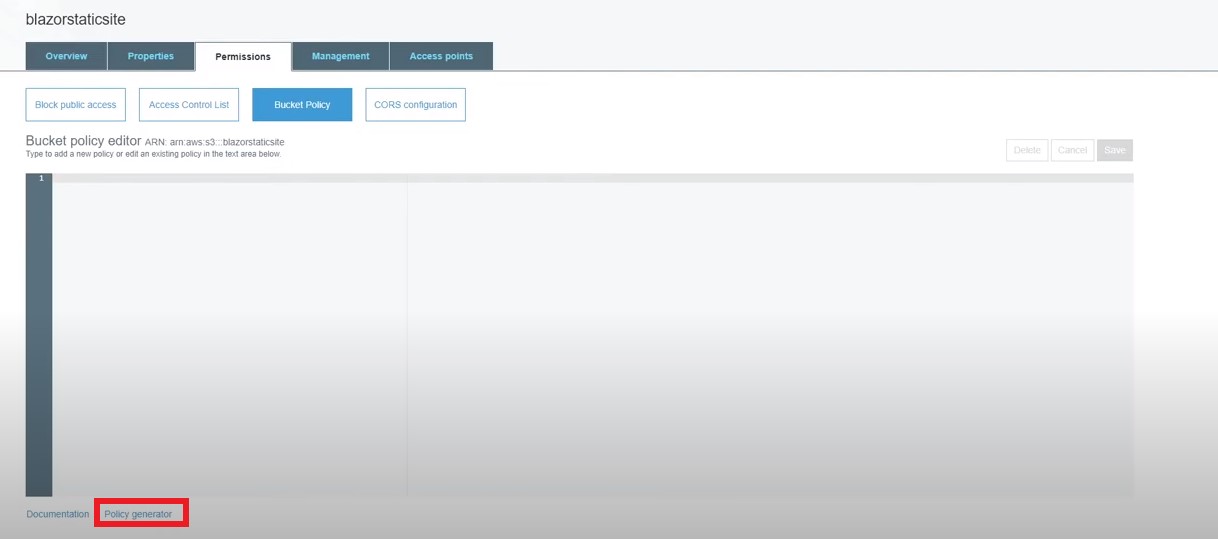
- Enter the AWS Principal you created for Github in the principal field.
- Enter the S3 ARN we copied in step 1 into the ARN field
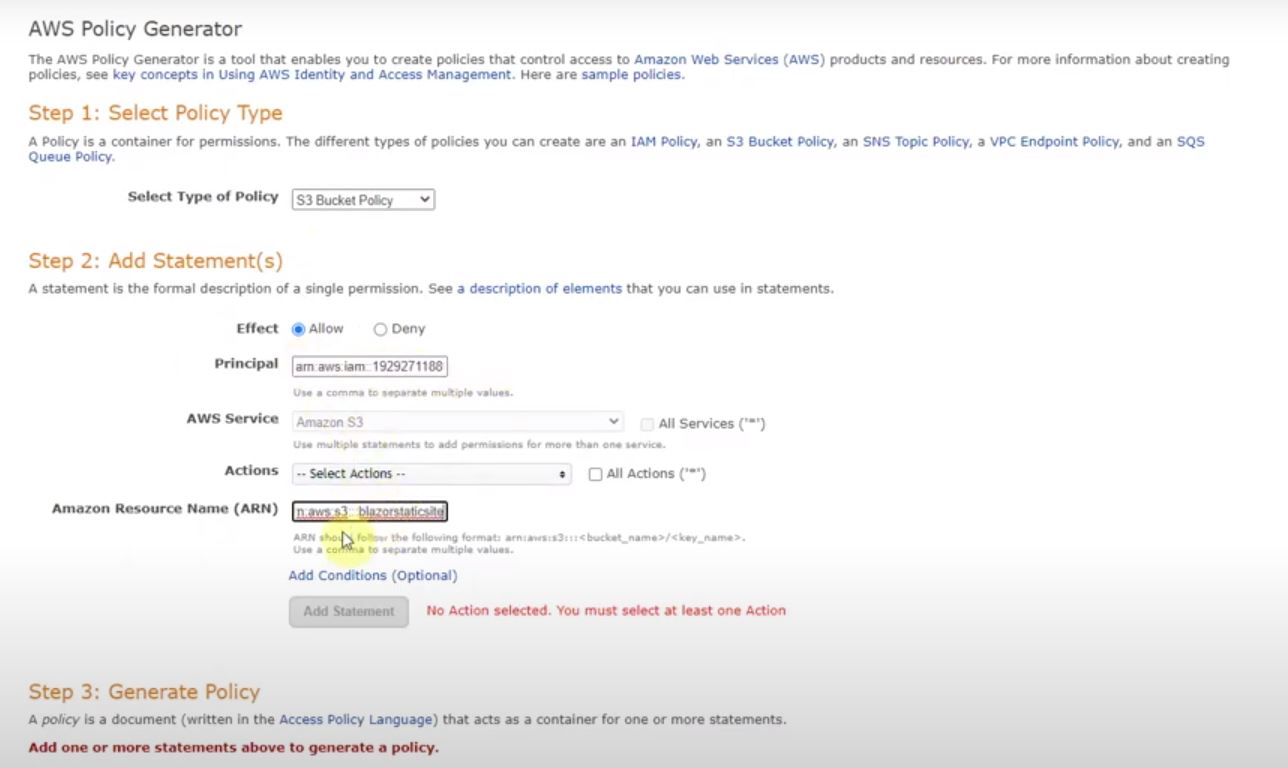
- Select the actions you want to allow this principal to have on this bucket.
- Click the Add Statement Button
- Now click the Generate Policy
- Copy the Generated Policy:
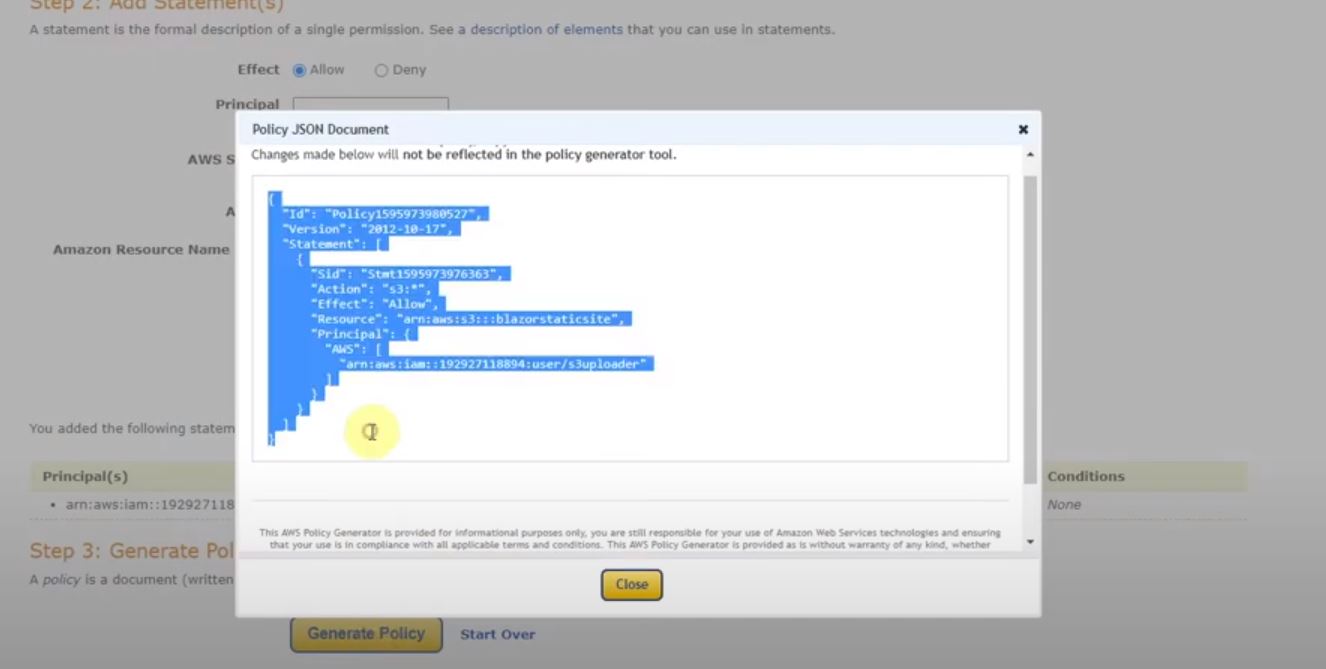
- Go back to the permissions tab of your bucket.
- Paste the policy and save
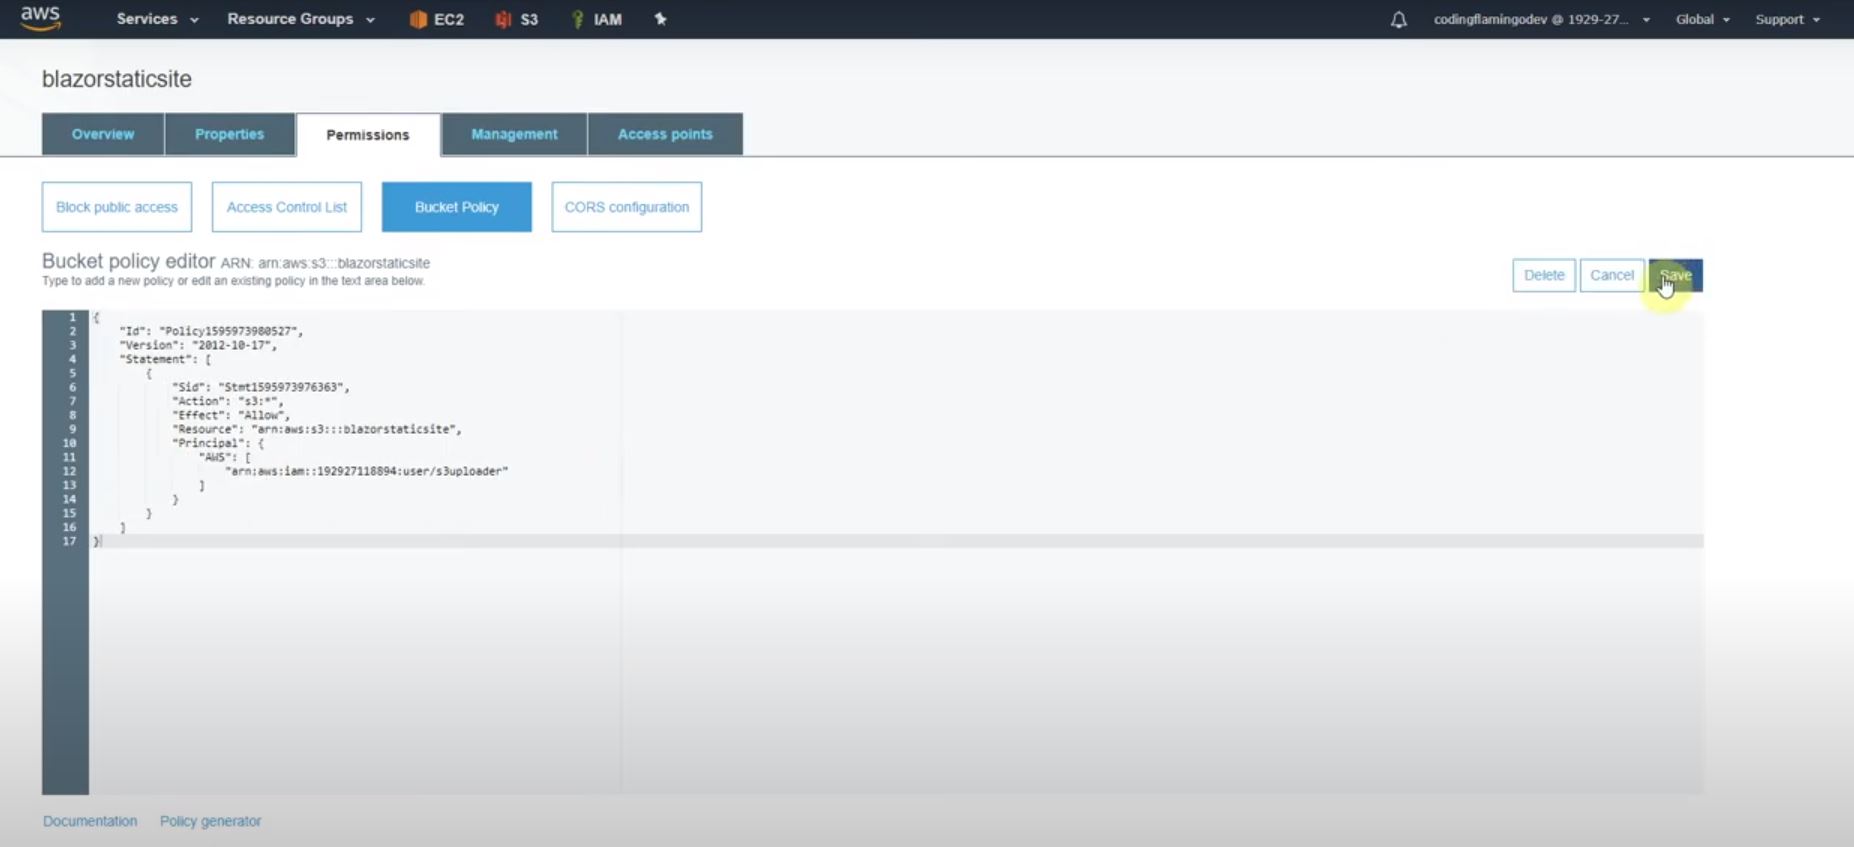
This finishes the AWS setup.
Setting up the GitHub Action
First we are going to create the workflow file for the GitHub Action, we first start with setting up the name for the Action and the trigger for the action (change this to the name you want and the trigger you want, this sample uses the name DeployToAWSS3 and it gets triggered when we push to the ‘dev’ branch)Full file:
name: DeployToAWSS3

on:
  push:
    branches:
      - dev
Then if you have to compile your site (in this example we use a Blazor Site that needs to be compiled) you add your compiling steps and publish the artifacts for the deploy action to download (if you don’t have to compile your site, you can skip this but note the deploy action grabs from artifacts so you would have to change that).
jobs:
  build:
    name: Build
    runs-on: ubuntu-latest
    steps:
    - uses: actions/checkout@v1

    - name: Set up .NET Core
      uses: actions/setup-dotnet@v1
      with:
        dotnet-version: '3.1.102'

    - name: Build with dotnet
      run: dotnet build --configuration Release

    - name: dotnet publish
      run: dotnet publish -c Release -o $/blazorapp

    - name: Publish artifacts
      uses: actions/upload-artifact@master
      with:
        name: blazorStaticSite
        path: $/blazorapp
Now for the deploy side of the file we are going to download the artifacts and then using the jakejarvis/s3-sync-action action we will push it to the bucket we created.
  deploy:
    needs: build
    name: Deploy
    runs-on: ubuntu-latest
    steps:

    # Download artifacts
    - name: Download artifacts
      uses: actions/download-artifact@master
      with:
        name: blazorStaticSite

    - name: Deploy to S3 🚀
      uses: jakejarvis/s3-sync-action@master
      with:
        args: --acl public-read --follow-symlinks --delete
      env:
        AWS_S3_BUCKET: 'blazorstaticsite'
        AWS_ACCESS_KEY_ID: $
        AWS_SECRET_ACCESS_KEY: $
        AWS_REGION: 'us-west-2'   # optional: defaults to us-east-1
        SOURCE_DIR: 'wwwroot'      # optional: defaults to entire repository
Now lets go through the variables of this section.
- First I download the artifacts from “blazorStaticSite” which is the folder I published the artifacts in the previews step.
- Then I used jakejarvis/s3-sync-action
- added the args
--acl public-readwhich makes each file public ` –follow-symlinkswhich changes symbolic links to the files since AWS has problems with it and–delete` which deletes any extra file in the bucket. - set the AWS_S3_BUCKET (this is the bucket name) to ‘blazorstaticsite’ which is the name of my bucket.
- Set the AWS_ACCESS_KEY_ID and AWS_SECRET_ACCESS_KEY to their respective secret name. (keep reading to see how to add those secrets).
- Set the AWS_REGION to match my bucket’s region.
- Set the SOURCE_DIR to wwwroot which is where my site is.
Adding the Github Secrets
- Go back to your repo and click on the settings tab:
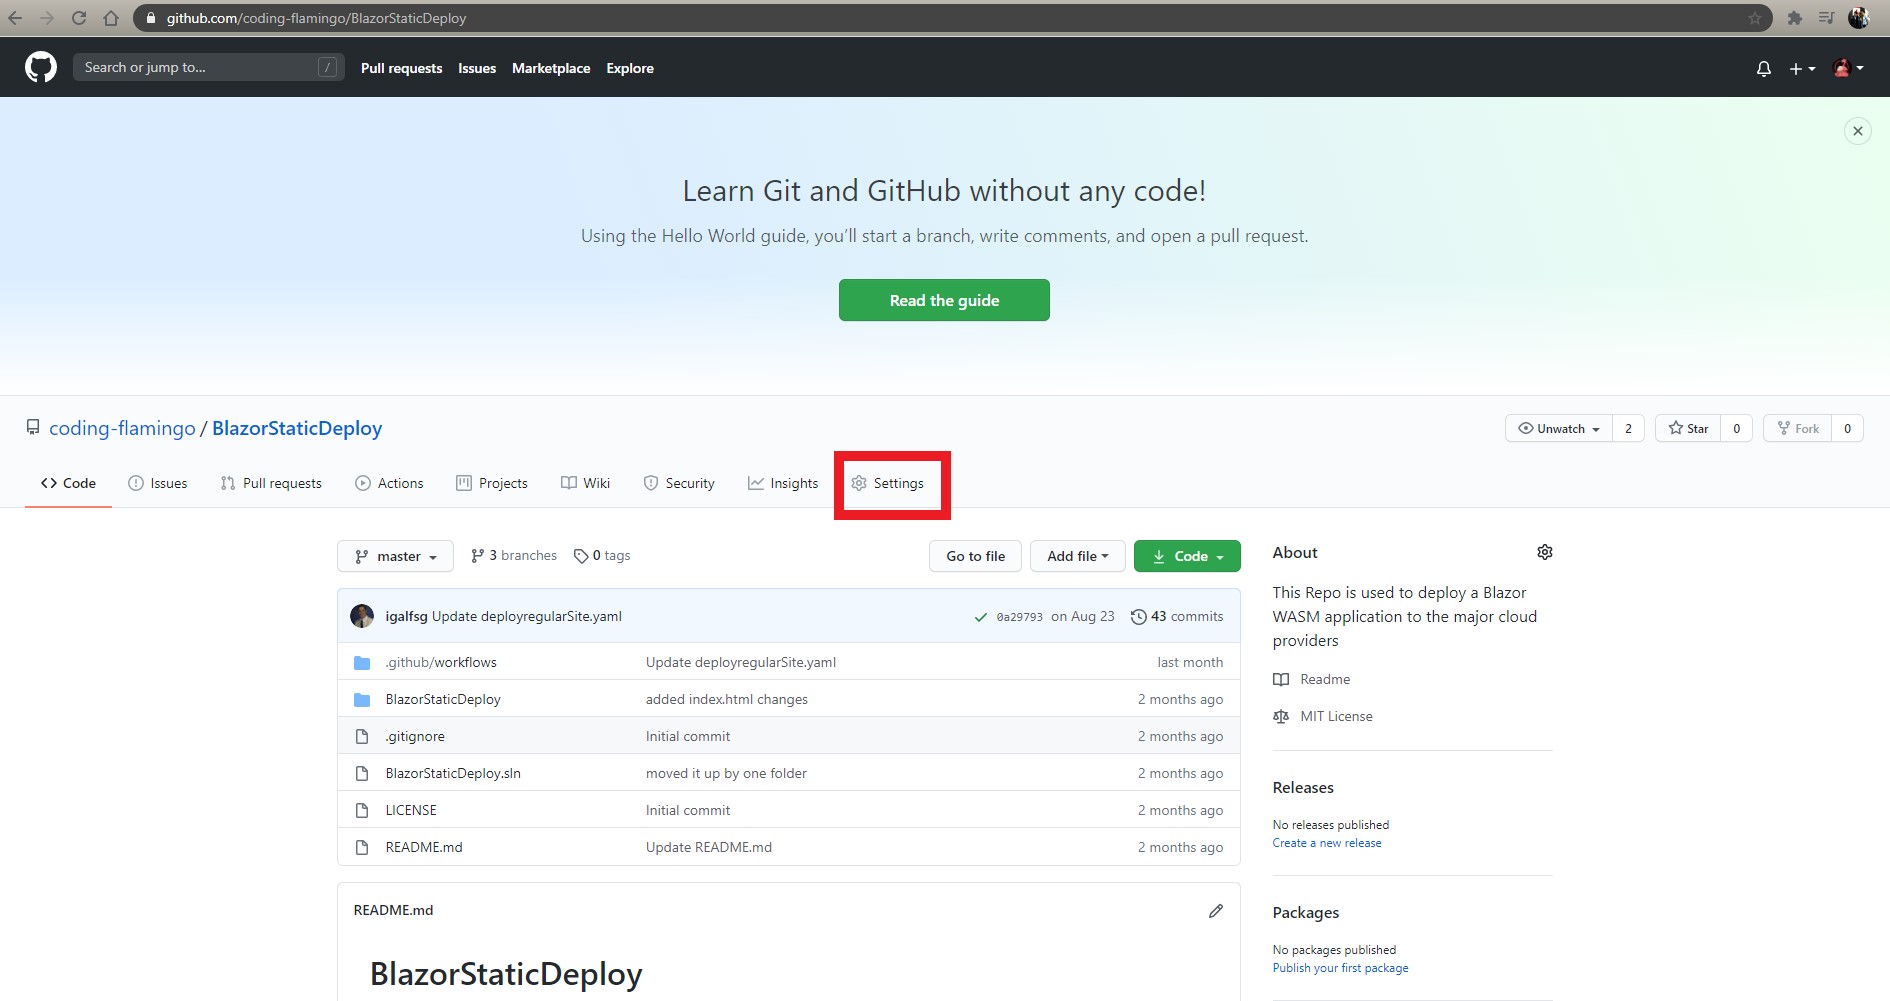
- Then on the left click on Secrets.
- Click on new Secret:
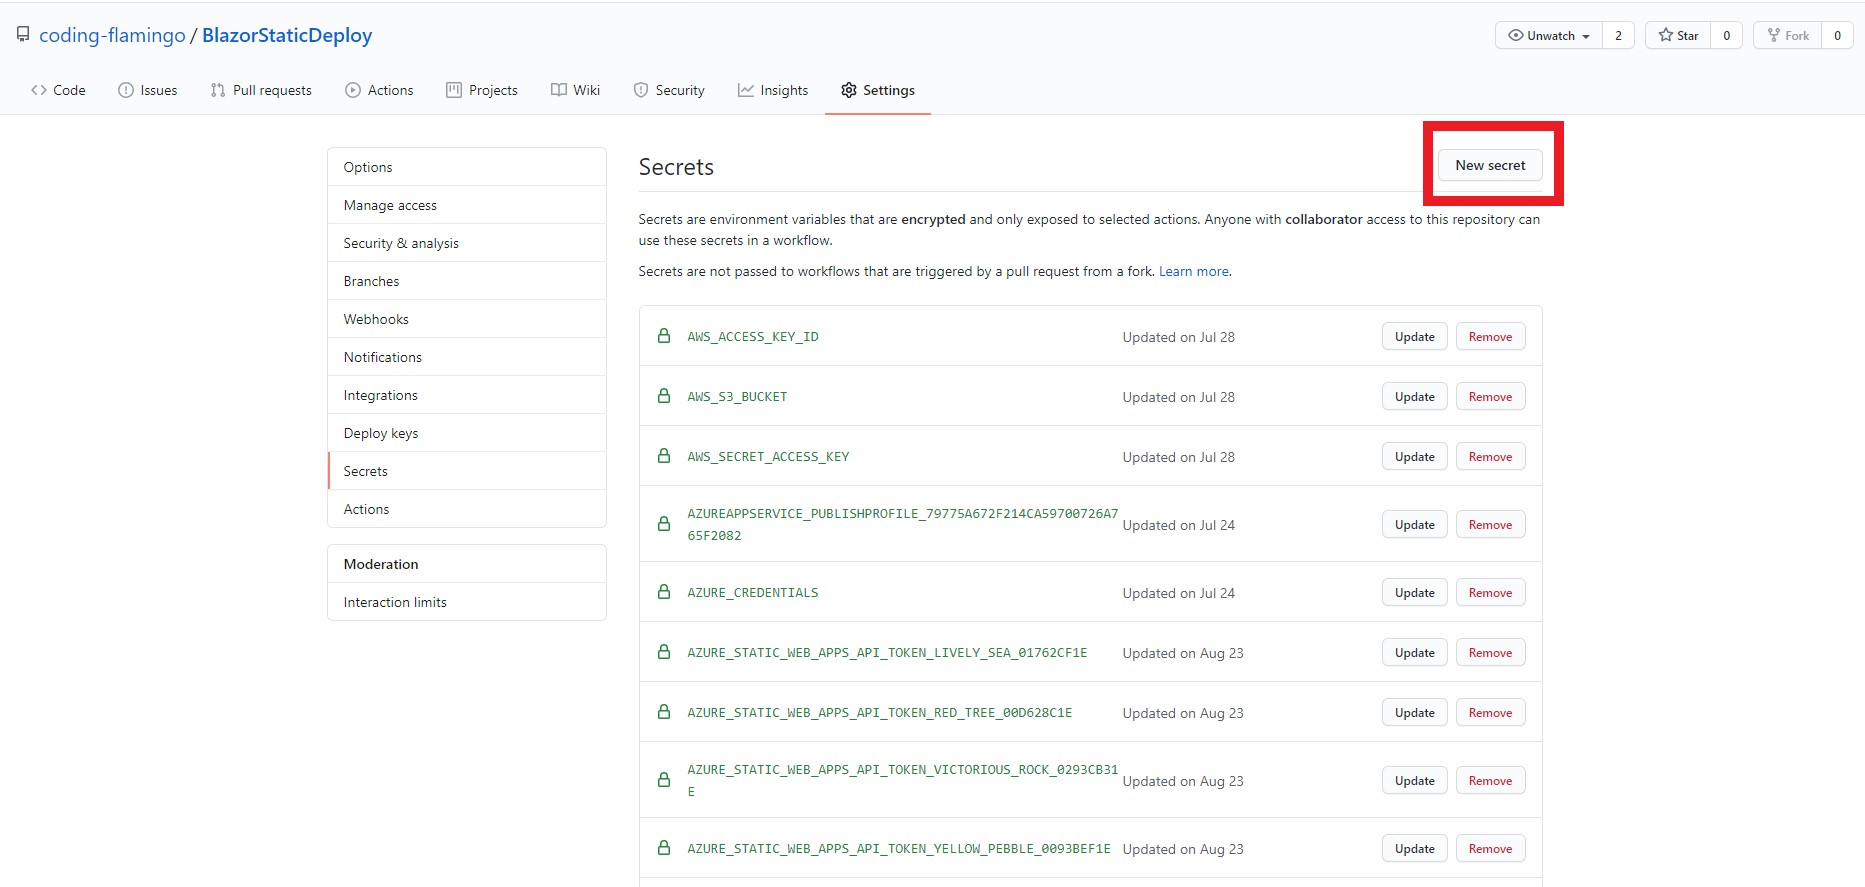
- Create a new Secret called
AWS_ACCESS_KEY_IDNote: the name is the same as we specified in the GitHub Action. - Paste the Access Key ID of the AWS IAM user you created for GitHub to upload to the Bucket.
- Create a new Secret called
AWS_SECRET_ACCESS_KEYNote: the name is the same as we specified in the GitHub Action. - Paste the Access Key Secret of the AWS IAM user you created for GitHub to upload to the Bucket.
Commit and Push
- commit and push to the branch you set as the trigger in the GitHub Action to trigger the action.
- in your repo go to Actions and make sure the action ran successfully.
Verify the site is up and running
- In the AWS console go back to your bucket and click on properties
- Click on Static Site and click your URL:
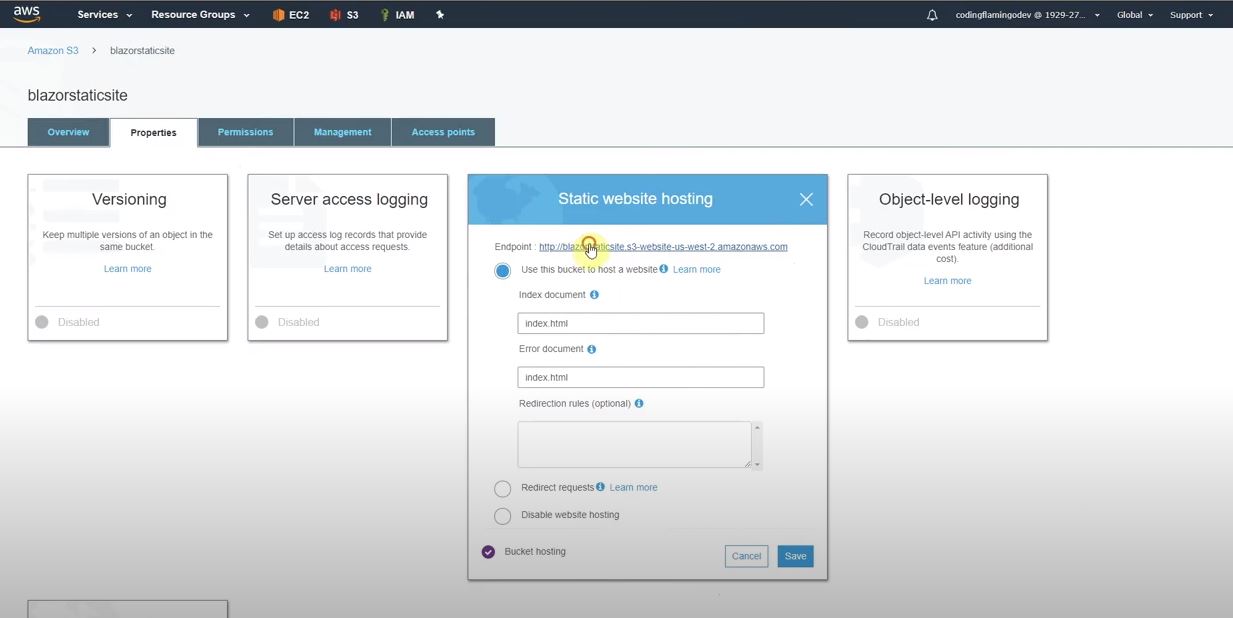
You are done :)
Comments
No comments found for this article.
Join the discussion for this article by commenting in this ticket. Comments appear on this page instantly.