Create Blazor WASM with AAD Authentication

Adding AAD Authentication to a website requires setting the application in Azure and then adding the appropiate code to your solution. In this post we will go over creating a new site with AAD Authentication using a dotnet template.
Video Version
Text Version
Creating the Server App in Azure
First thing we have to do is create an AAD Application for our server application.
- Go to Azure Portal.
- Click on Azure Active Directory.
- Select app registrations.
- Click the “New Registration” Button
- In here add your app name (I usually reference that is the server side app in the name by adding “frontend” at the end)
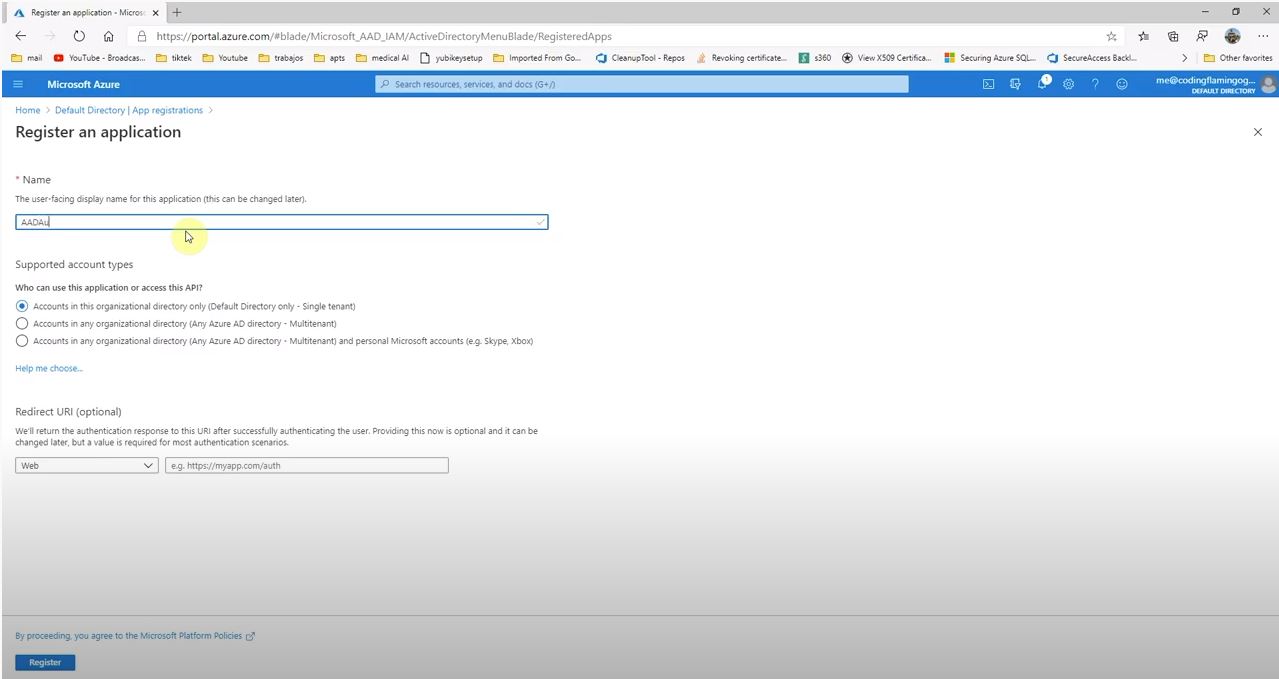
6.Select if you want it only for your tenant or multi tenant (If you do multitenant please watch this video to make sure your app is secure) 7.Click Register.
Setting up the Server App in Azure
1.Once the application is created, got to the application by going to Azure Active Directory > App Registrations and selecting the app you just created. 2.In here click on the “Expose an API” menu 3.Click on the add scope. 4.This will open a menu with the aplication ID uri being api://YOURAPPID 5.Click the “Save and Continue” button 6.For Scope name we are going to use “API.Access” in this tutorial but you can call it whatever you want as long as you change that to match your string for the rest of the tutorial.
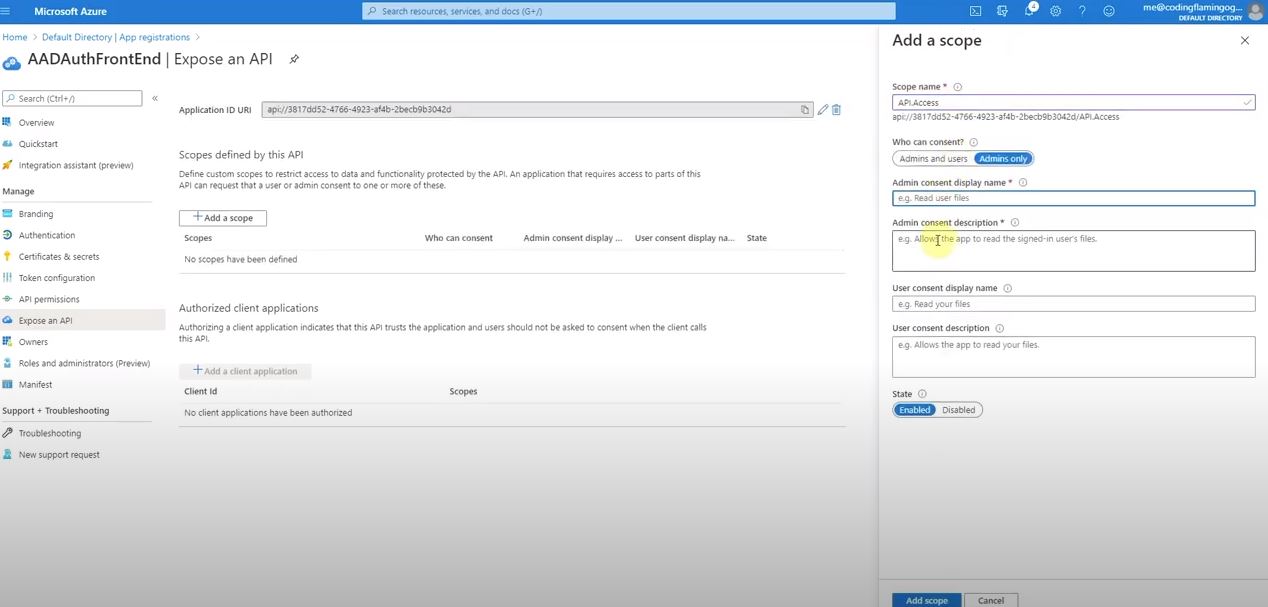
7.For who can consent set it if you want admin and users to be able to consent to this or just admins. (this might be overwritten by your AAD settings) 8.For admin Consent and Display name, this is what is going to show to the tenant admins when they are prompted to approve this on behalf of the tenant. So enter a meaningful name and description for them to know what the app is. 9.If the admin doesn’t grant approval for all the users and allows users to self approve for web application login, the user consent name and description is what will be shown to the users. 10.Click “Add Scope” button.
Creating the Client App in Azure
First thing we have to do is create an AAD Application for the client side of the application.
- Go to Azure Portal.
- Click on Azure Active Directory.
- Select app registrations.
- Click the “New Registration” Button
- In here add your app name (I usually reference that is the client side app in the name by adding “client” at the end)
6.Select if you want it only for your tenant or multi tenant (If you do multitenant please watch this video to make sure your app is secure) 7.If you already know the URL of your application, add the URL in the Redirect URI section. Since we still don’t know it we will add it later. 8.Click Register.
Giving the Client Access to the Server App
1.In the Azure portal go to the client application and click on API Permissions. 2.Click on Add Permsion 3.Click on the My APIs Tab.
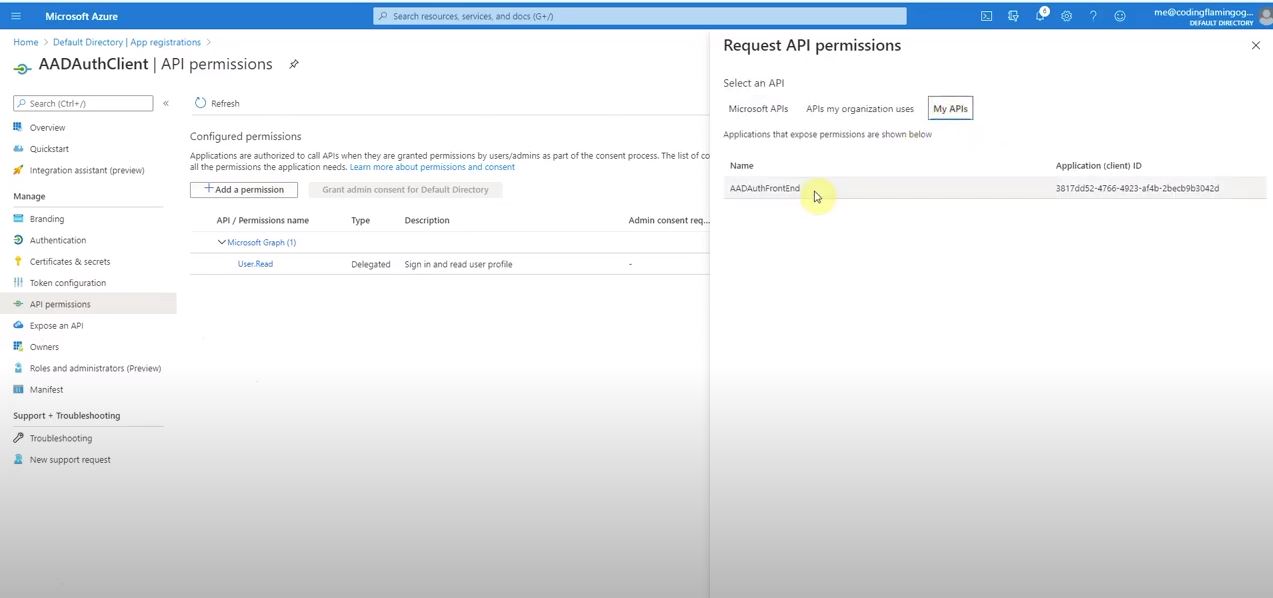
4.Click on the API we exposed from the server app. 5.Select the API.Access permission. 6.Click the “Add Permission” Button. 7.If you are a domain admin, you can grant that permission to this application on behalf of the users. If not, email your admin to do it for you.
Creating the dotnet Project
So now we have all we need to create the dotnet project. we will have to copy some info from the applications we created into the following command: dotnet new blazorwasm -au SingleOrg --api-client-id "WEBApp-ID" --app-id-uri "YOURAPPURI" --client-id "CLIENTAPP-ID" --default-scope "API.Access" --domain "TENANTURL" -ho --tenant-id "TENANTID" -o SOLUTIONNAME
- Replace
WEBApp-IDwith the app ID of your server side application. - Replace
YOURAPPURIwith the your server side appID - Replace
CLIENTAPP-IDwith your client side app ID - Replace
TENANTURLwith your tenant URL for example mine iscodingflamingogmail.onmicrosoft.com - Replace
TENANTIDwith your tenant ID You can always copy it from the azure active directory tab in the Azure portal. - Replace
SOLUTIONNAMEwith the name you want your Visual Studio project to have.
Now that you have your command ready, open Powershell and navigate to the folder where you want your solution to be and run the command.
Adding the Redirect URL to Azure Client App
Although it helps a lot to start from the template, there are some things we have to change. (and before we forget we havent added the redirect URL to the Client App in Azure)
So first lets just run the code (1. it makes sure that the code works before we touched it. 2. It is the easiest way to get the URL that Visual Studio is using for debugging).
1.Once you run it let’s copy that URL (should be something like https://localhost:44392) 2.Lets go back to the client app in the Azure Portal and Click on Authentication. 3.Click on “Add a platform” 4.Select Web 5.Add your URL and append /authentication/login-callback at the end. For example ours would look like https://localhost:44392/authentication/login-callback 6.Select the Access tokens and ID tokens checkbox
When you move this to prod, you have to repeat this step but with the URL that your app will use.
Modifying the code to make it work
If you open program.cs in the client project, you will se around line 30 a line that has the following:
options.ProviderOptions.DefaultAccessTokenScopes.Add("api://YOURAPPID/API.Access"); If you run with this you will get a token error, so you sould remove the “api://” and just leave your appID/API.Access
Comments
No comments found for this article.
Join the discussion for this article by commenting in this ticket. Comments appear on this page instantly.